Windows:
- Go to http://www.oracle.com/technetwork/java/javase/downloads/index.html
- Press the "Download JDK" button of the “Java Platform, Standard Edition” table (the first table). As of today (Jan. 13, 2011), it says Java SE 6, Update 23.
- Select the Platform, Accept the License Agreement, and press
Continue to download the installer.
NOTE: if you have a 64 bit windows, please be sure to select Windows 64. - After downloading, you need to install the JDK. Please double-click the downloaded installer. During installation, you can choose all of the default options.
MAC:
Macs with the OS X operating system will have the
Java compiler available automatically, so you might be able to skip this
instllation. But many Macs appear to have an out-of-date version of JDK.
Some newer Macs (purchased within the last year or so)
have the latest Mac version of JDK (version 6.0). For older Macs, you
might want to run your Mac's built-in Software Update feature to see if
it updates your Java for you.
-
Test Java version: You can test whether your Mac has Java installed (and if so, what version) using the Terminal application. To run the terminal, use your Spotlight icon at the upper-right of your screen to search for Terminal. It will find and suggest the Terminal application. Click it to run the terminal. A white window will appear with black text and a blinking cursor for you to type commands. Type the following command and press Enter, to see your version of Java:
java -version -
If your Mac doesn't have Java installed already (or has an obsolete version installed), you can go to the web page below to download it. Choose the link that matches your version of Mac OS X. You can see your OS X version by clicking the Apple icon on the top-left of your screen and choosing "About this Mac."
-
Java for Mac OS X 10.6 ("Snow Leopard") Update 3: http://support.apple.com/kb/dl972
-
Java for Mac OS X 10.5 ("Leopard") Update 8: http://support.apple.com/kb/dl971
-
-
-
The preceding downloads come as .dmg disk images. Once you download one of them, you double-click it in the Finder to mount it as a temporary disk. Inside is a .pkg file representing the JDK application installer. Run this .pkg file to install JDK.
Linux:
It's tougher to give an installation guide for Linux because of the large variety of different distributions and architectures. Here is a rough guide that will work for many distributions such as Ubuntu.
-
Type the following three commands:
sudo add-apt-repository "deb http://archive.canonical.com/ lucid partner"
sudo apt-get update
sudo apt-get install sun-java6-jdk
Or use the Step 1 of Windows to download by choosing Linux or Linux 64.
-
After installing Java, you will probably wish to add Java's directory to your PATH setting, so that you can run Java commands from your terminal. To do so, edit the file .bashrc in your home directory and add the following lines to the end of it:
export PATH=/usr/lib/jdk/bin:$PATH
export CLASSPATH=.
You should close your terminal and open a new one for the PATH changes to take effect.
Step 1.2 [optional]: Install an Java Integrated Development Environment (IDE)
This step is optional, depending on how you want to develop Java programs. There are many Java IDEs available.
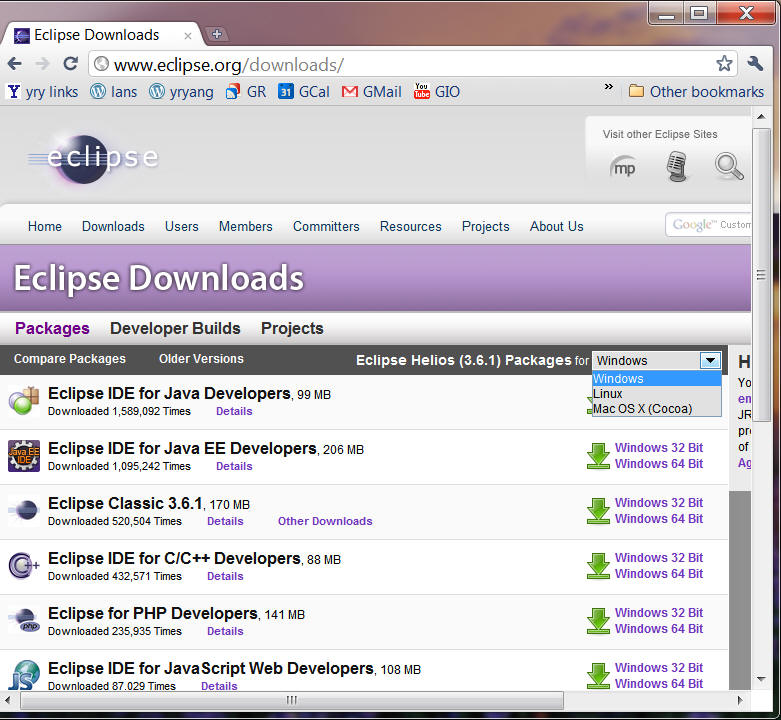
We recommend Eclipse, as it is an IDE used by professional computer programmers as well. It has a great online help system. Later in the semester, if you want, you can develop Google Android applications using eclipse easily. Eclipse is available at: http://www.eclipse.org/downloads/.
-
Windows: Please choose Eclipse IDE for Java Developers, and pick Windows 32 Bit or Windows 64 bit.
-
For MAC: Please choose Mac OS X (Cocoa)
After downloading eclipse, please click it to extract the programs. Please remember where you extract it. It may be helpful to create a shortcut to the eclipse program (<your-extract-dir>/eclipse/eclipse) .
Another good IDE is Dr. Java:
- http://www.drjava.org/
Unlike some software packages, the DrJava is a single executable file. Please remember where you have downloaded it so that you can click on it to launch it.
Step 2: Setting up Environment
Once you have Java JDK installed, you must check if your operating system knows where it is. If you have an IDE, you can try starting it up and seeing if it complains about Java not being present. If not, congratulations! You can go to the next step. You can also test using a command-line window by typing javac in a command-line window. To start a command-line window:
- Windows 7: Click the Start button on the lower left corner, type "cmd" (no quotes) into Search programs and files, and click on the cmd icon.
- Windows XP and earlier: Click Start, choose Run, enter "cmd" (no quotes), and hit return.
- For Mac OS X, in the Applications/Utilities/ folder, you'll find the Terminal.
- Linux: start any shell.
In the command window, type
javac
If
you do not get a message saying that the command
isn't recognized, great. Please proceed to the next step! Otherwise, you need to edit your "environment variables" to tell your computer
where to look for javac. Environment variables are little snippets of
information that the OS uses so it won't have to keep asking you questions like
"Where's your login directory?" or "Can I execute a .BAT file?" A key
environment variables is the PATH variable that tells the OS where to look for
executable programs.
- Windows: On a Windows machine, the value of the
PATH
variable is a string of directories separated by semicolons. To set it on a
Windows machine (e.g., Windows 7), click on the Start button on the lower left corner
of your screen, and search for environment. You should see an item
labeled from Control Panel: "edit environment variables for your account". Click on it and you should be looking at a dialogue box with two panels. The top one shows your
variables, the bottom the System's. In the top one the relevant variable is PATH; in the bottom it's
Path. If you have administrator
privileges, you can change the bottom one; otherwise, you can only change the
top one. We recommend the top one.

Select the variable, push the Edit button, and carefully add to the end of the existing value the string
;C:\Program Files\Java\jdk1.6.0_23\bin.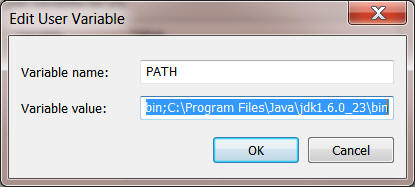
If the variable doesn't exist, or is blank, hit the New button and define the PATH variable. Its value is the same as the previous string, but without the leading semicolon. - Linux: PATH is a string of directories separated by colons. On a Unix machine, chances are that installing the JDK will make it visible
without any further twiddling. But if the system still doesn't recognize javac or
java, you must fiddle with environment variables. First,
figure out where the newly installed Java lives. Suppose its /usr/java/bin.
Environment variables are set in the initialization files that are run when your
shell starts up. Most people nowadays tend to use the "bash" shell, in which
case the relevant initialization file is in your home directory and is named .profile. Open or create this file, and at the end add
export PATH=${PATH}:/usr/java/bin/
Note: /user/java/bin is something we made up; put the actual directory here.
Step 3: Programming
Now, with the Java compiler and interpreter installed, we can finally start to program! How exciting! We consider two scenarios:
Scenario I: Command window
You maintain a program (e.g., Hello.java) as an ordinary text file, and you write and edit your program with a text editor of your choosing ("Notepad" if you're desperate). For example, a popular editor is emacs (a help file for using emacs). Emacs was written for the Gnu-Linux system, and the latest versions are produced for Linux and other "mainstream" Unix systems first. The Windows version is now maintained on an official basis, and closely tracks the latest Unix version. Mac OS X, although it is Unix, presents some special problems for Emacs, mainly because the Mac uses a different window-management system from everyone else. Another one is pico.
After writing or editing your program using your text editor, you compile your program in a command-line window. You first type
javac Program.java
to compile the program to generate Program.class. Then you type
java Program
to run it.
Scenario II: Using an IDE
Using a general text editor is fast. However, many people prefer an Interactive Development Environment (IDE), which provides Java-specific editing capability. Also, an IDE can invoke Java compiler and interpreter automatically without requiring you to use a command-line window.
We use problem assignment 1 as an example of how to use eclipse [We assume you installed eclipse in Step 1.2]
- Step 1: Launch eclipse by double clicking on eclipse.exe.
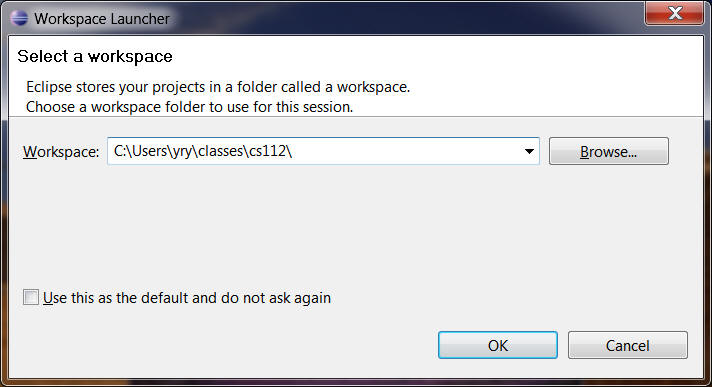
- Step 2: eclipse asks for a workspace. The workspace is where you put
your Java projects. Select an empty directory and press OK.
Close the Welcome screen by clicking the "X" by Welcome. - Step 3: Create a project through the menu: File -> New -> Java Project.
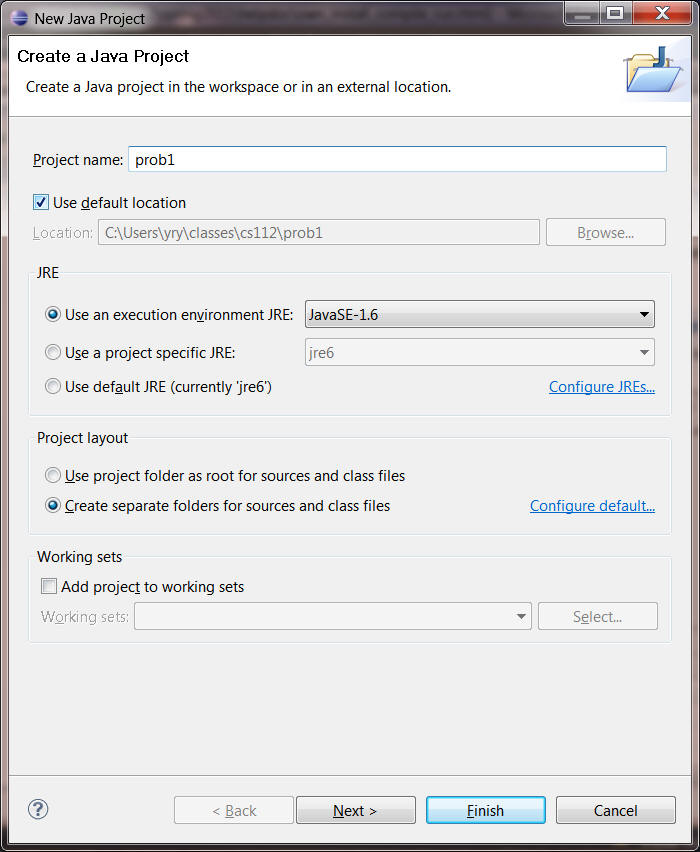
Click Finish. - Step 4: Now create a first Java class: HelloWorld.java. To do so, open
prob1 in the Package Explorer pane, choose src, right click and choose New and then Class.
Put HelloWorld in Name, check "public static void main(String[] args)":
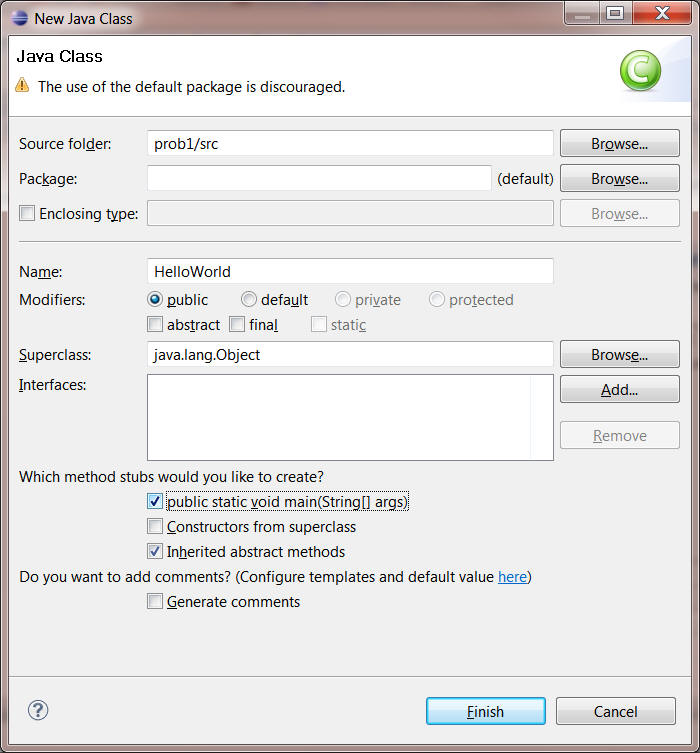
Click finish, you have:
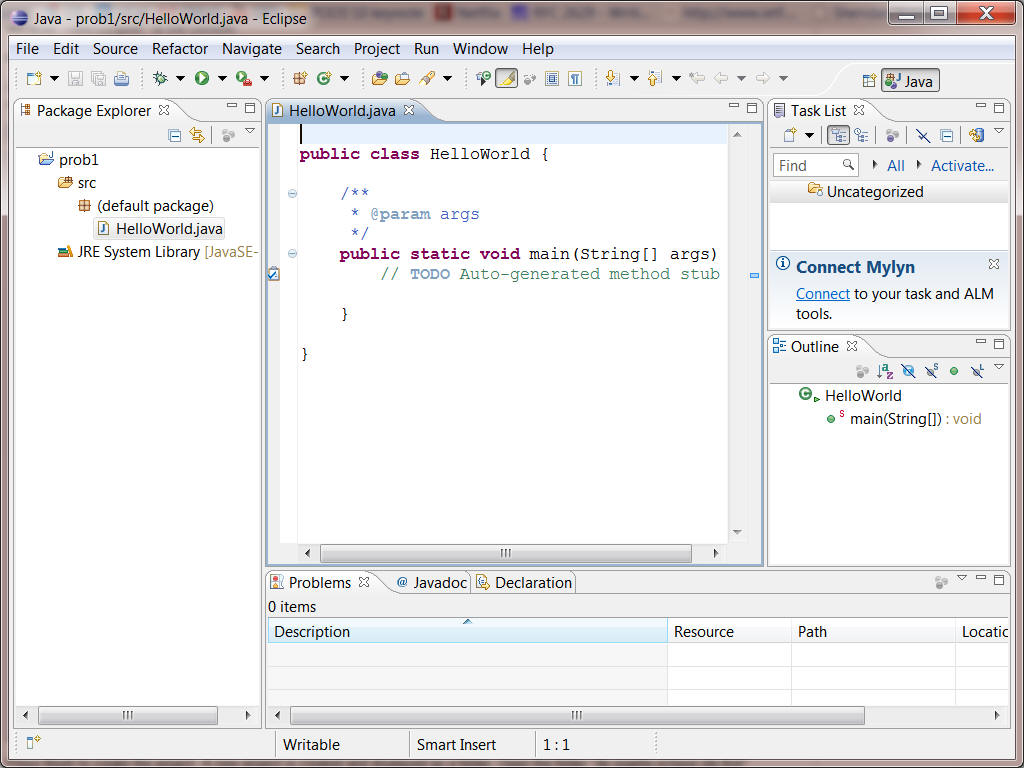
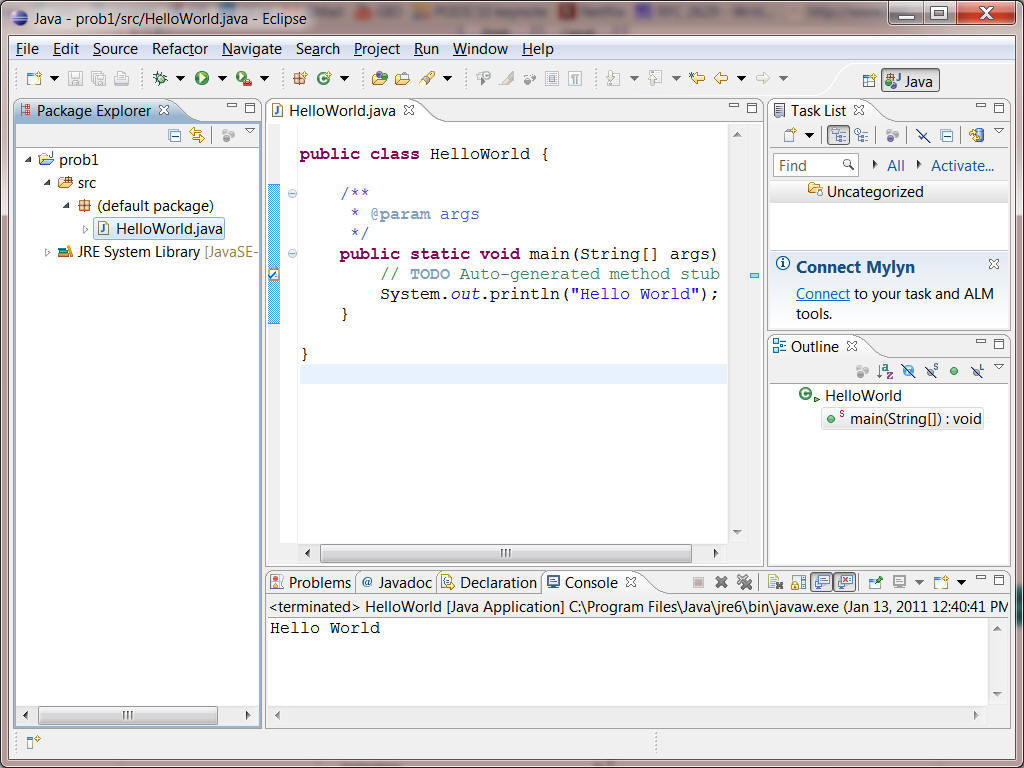
- Step 5: type in the System.out.println statement:

- Step 6: Run your program: by choosing HelloWorld.java, right click, Run
As -> Java Application. OK Save. You will see the output at the console:
- Step 7: Introduce errors (e.g., change out to owt), Run As -> Java
Application -> Proceed. You will see the error message. You may
cut-and-paste the error message to a text file. To create Errors.txt, choose
src -> New -> File and put Errors.txt as file name:

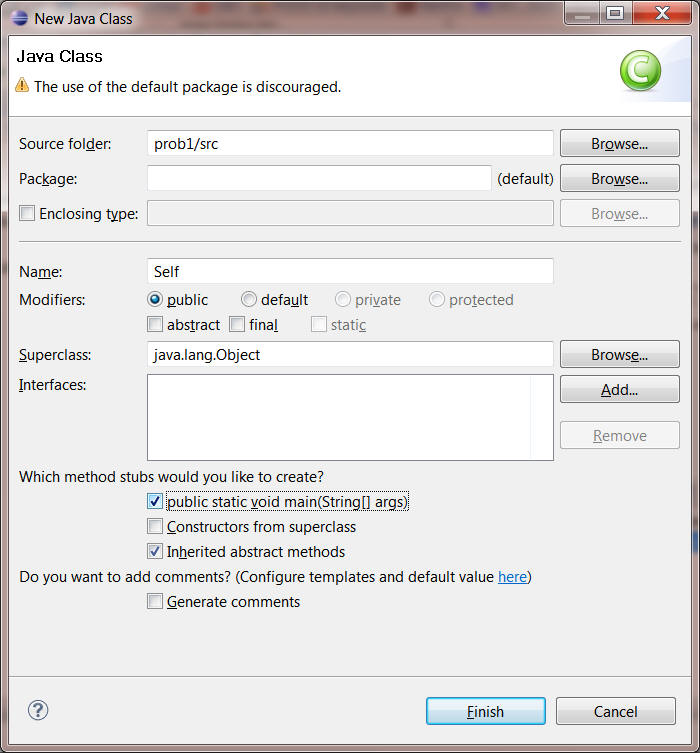
- Step 8: Create Self.java similar to creating HelloWorld.java (i.e.,
choose src -> New -> Class). You can run Self.java similarly as well.
- Step 9: Finish programming Self.java
- Next, please check out how to submit homework.
- You are done. Isn't it easy?!